WebGL Tutorial: Directional Shadow Mapping without extensions
Welcome back to another WebGL tutorial 🎉
In this tutorial we’ll introduce the concepts behind real time directional light shadow mapping and then walk through a full working example implementation.
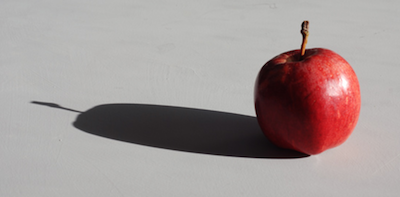 The apple blocks the light, causing a shadow
We’ll be using a color texture technique that maximizes our compatability with different machines and mobile devices.
By the end of the tutorial you’ll hopefully walk away with an understanding of the core ideas behind shadow mapping as well as a reference implementation should you decide to implement shadow mapping yourself.
Achieving maximum compatability
While we won’t be using it this time around, the easiest way to implement shadow mapping in WebGL is by taking advantage of the WEBGL_depth_texture extension.
In a nutshell, WEBGL_depth_texture gives you easy access to the depth buffer.
The depth buffer helps you know when something is behind or in front of something else. This is the key information that powers shadow mapping, so being able to access the depth buffer easily is advantageous.
The problem with WEBGL_depth_texture, however, is that the extension might not be supported on your user’s device.
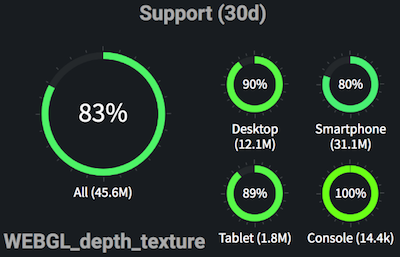 WEBGL_depth_texture support according to webglstats.com (probably even lower)
Luckily, with some workarounds you can accomplish shadow mapping without using WEBGL_depth_texture, and that is exactly what we’ll be doing in this tutorial.
In a real application you might prefer to take advantage of WEBGL_depth_texture, but still use the approach that we’ll learn in this tutorial as a fallback for when your user’s device doesn’t support the WEBGL_depth_texture.
What is a shadow?
Take a second and think of the last time you were outside on a sunny day (unless you happen to live in a cave, in which case how do you have wifi?).
Where does your shadow get cast? If you think carefully you’ll notice that you’re always right in between the sun and your shadow. Your shadow occurs wherever the sun’s light hits you before it has a chance to hit the ground.
click and drag to move the camera
It turns out that we can model this phenomenon in computer graphics.
Step one is to render the scene from the sun’s point of view. In our demo the sun can see the dragon, but it can’t see that piece of ground behind the dragon that ends up in the shadow.
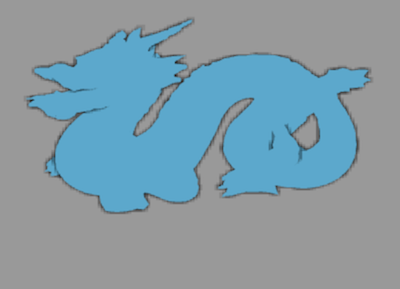 Everythng behind this orthographic projection is in shadow
We encode the depth of the fragments of our dragon into a color texture. Later when we render the entire scene we’ll check where each fragment in our camera’s scene would have been if we had drawn it from the light’s view.
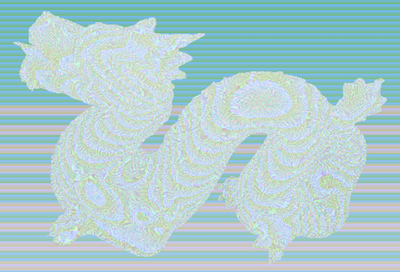 We encode object’s distances from the light’s view into a texture
If the fragment would have been behind the first thing that the light saw, it is in the shadow so we’ll render it a bit darker.
How we create our color texture
Here are the steps that we’ll take:
-
We render the scene from the light’s point of view in order to know what objects are blocking its rays.
-
We encode the distance of everything that the light sees into a texture. Every color in our texture represents some float distance away from the camera between
0.0and1.0. The texture ends up looking something like this:
We encode object’s distances from the light’s view into a texture -
Later when we render our scene from our camera’s perspective, we use this texture to figure out whether or not the light can see the fragment in question. If it can’t, then the fragment is in the shadow so we darken it.
Now that we have a better sense of what we’ll be doing, let’s quickly grab our dependencies and start writing some code!
Downloading our dependencies
gl-mat4 helps us handle our matrix math, budo is our development server that helps us view our demo locally and stanford-dragon gives us the vertex data that we use to draw our demo dragon.
mkdir webgl-shadow-map-tutorial
cd webgl-shadow-map-tutorial
touch tutorial.js
npm install gl-mat4@1.1.4 budo@10.0.4 \
stanford-dragon@1.1.1
Now that we’ve downloaded our dependences, from here on out you will no longer need an internet connection.
Building our shadow map demo
We’re going to step through the creation of our demo. You’ll learn the most if you type along as you go, but you can also find the full shadow mapping source code on GitHub.
Open up the tutorial.js that you created above and let’s get started!
First we create our canvas and insert it into the page. We’ll later draw our scene onto this canvas every request animation frame.
var glMat4 = require('gl-mat4')
var stanfordDragon = require('stanford-dragon/4')

var canvas = document.createElement('canvas')
canvas.width = 500
canvas.height = 500
var mountLocation = document.getElementById(
  'webgl-shadow-map-tut'
) || document.body
mountLocation.appendChild(canvas)
Next we grab our WebGL context and enable depth testing.
We need depth testing because we need to be able to figure out if a fragment is in front of or behind another fragment.
var gl = canvas.getContext('webgl')
gl.enable(gl.DEPTH_TEST)
As we’ve done in the past, we set up some controls so that we can move our camera around by clicking and dragging our mouse or finger.
var canvasIsPressed = false
var xRotation = Math.PI / 20
var yRotation = 0
var lastPressX
var lastPressY
canvas.onmousedown = function (e) {
  canvasIsPressed = true
  lastPressX = e.pageX
  lastPressY = e.pageY
}
canvas.onmouseup = function () {
  canvasIsPressed = false
}
canvas.onmouseout = function () {
  canvasIsPressed = false
}
canvas.onmousemove = function (e) {
  if (canvasIsPressed) {
    xRotation += (e.pageY - lastPressY) / 50
    yRotation -= (e.pageX - lastPressX) / 50

    xRotation = Math.min(xRotation, Math.PI / 2.5)
    xRotation = Math.max(xRotation, 0.1)

    lastPressX = e.pageX
    lastPressY = e.pageY
  }
}

canvas.addEventListener('touchstart', function (e) {
  lastPressX = e.touches[0].clientX
  lastPressY = e.touches[0].clientY
})
canvas.addEventListener('touchmove', function (e) {
  e.preventDefault()
  xRotation += (e.touches[0].clientY - lastPressY) / 50
  yRotation -= (e.touches[0].clientX - lastPressX) / 50

  xRotation = Math.min(xRotation, Math.PI / 2.5)
  xRotation = Math.max(xRotation, 0.1)

  lastPressX = e.touches[0].clientX
  lastPressY = e.touches[0].clientY
})
Next we create the vertex shader that allows up to render the scene from the light’s viewpoint.
Notice our shadow depth color texture size is 1024x1024. Super old mobile devices from a decade ago such as the original iPhone have a limit of 1024x1024 textures. Phones from a few years ago might have a limit of 2048x2048. An iPhone 7 has a limit of 4096x4096.
But you don’t want to just choose the largest limit available. The larger your texture the more work your GPU will need to do to render it every frame.
The smaller your texture, the more crude your shadows look because you couldn’t fit enough information into your texture so many neighboring fragments end up using data that wasn’t truly meant for them.
I like to default to 512 and go up or down from there, but it comes down to the visual quality vs. the performance tradeoff of your application.
var shadowDepthTextureSize = 1024

var lightVertexGLSL = `
attribute vec3 aVertexPosition;

uniform mat4 uPMatrix;
uniform mat4 uMVMatrix;

void main (void) {
  gl_Position = uPMatrix * uMVMatrix * vec4(aVertexPosition, 1.0);
}
`
Next we create out light’s fragment shader. It gets the depth into the scene of every fragment that it sees, encodes this depth into a color, and then writes this encoded distance color onto a texture.
var lightFragmentGLSL = `
precision mediump float;

vec4 encodeFloat (float depth) {
  const vec4 bitShift = vec4(
    256 * 256 * 256,
    256 * 256,
    256,
    1.0
  );
  const vec4 bitMask = vec4(
    0,
    1.0 / 256.0,
    1.0 / 256.0,
    1.0 / 256.0
  );
  vec4 comp = fract(depth * bitShift);
  comp -= comp.xxyz * bitMask;
  return comp;
}

void main (void) {
  gl_FragColor = encodeFloat(gl_FragCoord.z);
}
`
Our camera renders our scene, but also takes in the uniforms for our light’s projection and view matrices. We use these to determine where this vertex would have been if the light was looking at it.
Knowing where the light would have thought this vertex was allows us to look at the color that this vertex has in our light’s depth color texture.
For example, if the light has the closest distance when looking directly at this vertex encoded as a 0.2, but our current vertex would have been a 0.8 depth in the lights view, we know to darken it.
var cameraVertexGLSL = `
attribute vec3 aVertexPosition;

uniform mat4 uPMatrix;
uniform mat4 uMVMatrix;
uniform mat4 lightMViewMatrix;
uniform mat4 lightProjectionMatrix;

const mat4 texUnitConverter = mat4(0.5, 0.0, 0.0, 0.0, 0.0, 0.5,
0.0, 0.0, 0.0, 0.0, 0.5, 0.0, 0.5, 0.5, 0.5, 1.0);

varying vec2 vDepthUv;
varying vec4 shadowPos;

void main (void) {
  gl_Position = uPMatrix * uMVMatrix * vec4(aVertexPosition, 1.0);

  shadowPos = texUnitConverter * lightProjectionMatrix *
  lightMViewMatrix * vec4(aVertexPosition, 1.0);
}
`
Now that our vertex shader has figured out the coordinates of all of our vertices were they to be viewed from the light’s viewpoint, our fragment shader goes through every fragment and asks “Am I behind or in front of the first thing that the light saw?”
If a fragment is behind, we darken it.
We don’t just have a constant multiplier for dark or light though. Instead we use a technique called “Percentage Closer Filtering”.
In a nutshell, we loop through nearby fragments and find out on average how much all of them are in shadow.
This smooths out the edges of our shadow since with a limited resolution depth color texture some fragments at the edge might sample the wrong depth and thus lead to jagged edges.
var cameraFragmentGLSL = `
precision mediump float;

varying vec2 vDepthUv;
varying vec4 shadowPos;

uniform sampler2D depthColorTexture;
uniform vec3 uColor;

float decodeFloat (vec4 color) {
  const vec4 bitShift = vec4(
    1.0 / (256.0 * 256.0 * 256.0),
    1.0 / (256.0 * 256.0),
    1.0 / 256.0,
    1
  );
  return dot(color, bitShift);
}

void main(void) {
  vec3 fragmentDepth = shadowPos.xyz;
  float shadowAcneRemover = 0.007;
  fragmentDepth.z -= shadowAcneRemover;

  float texelSize = 1.0 / ${shadowDepthTextureSize}.0;
  float amountInLight = 0.0;

  for (int x = -1; x <= 1; x++) {
    for (int y = -1; y <= 1; y++) {
      float texelDepth = decodeFloat(texture2D(depthColorTexture,
      fragmentDepth.xy + vec2(x, y) * texelSize));
      if (fragmentDepth.z < texelDepth) {
        amountInLight += 1.0;
      }
    }
  }
  amountInLight /= 9.0;

  gl_FragColor = vec4(amountInLight * uColor, 1.0);
}
`
Next we link our two shader programs. Nothing too special going on here.
var cameraVertexShader = gl.createShader(gl.VERTEX_SHADER)
gl.shaderSource(cameraVertexShader, cameraVertexGLSL)
gl.compileShader(cameraVertexShader)

var cameraFragmentShader = gl.createShader(gl.FRAGMENT_SHADER)
gl.shaderSource(cameraFragmentShader, cameraFragmentGLSL)
gl.compileShader(cameraFragmentShader)

var cameraShaderProgram = gl.createProgram()
gl.attachShader(cameraShaderProgram, cameraVertexShader)
gl.attachShader(cameraShaderProgram, cameraFragmentShader)
gl.linkProgram(cameraShaderProgram)

var lightVertexShader = gl.createShader(gl.VERTEX_SHADER)
gl.shaderSource(lightVertexShader, lightVertexGLSL)
gl.compileShader(lightVertexShader)

var lightFragmentShader = gl.createShader(gl.FRAGMENT_SHADER)
gl.shaderSource(lightFragmentShader, lightFragmentGLSL)
gl.compileShader(lightFragmentShader)

var lightShaderProgram = gl.createProgram()
gl.attachShader(lightShaderProgram, lightVertexShader)
gl.attachShader(lightShaderProgram, lightFragmentShader)
gl.linkProgram(lightShaderProgram)
We initialize our vertex data for our dragon and our floor.
var floorPositions = [
  -30.0, 0.0, 30.0,
  30.0, 0.0, 30.0,
  30.0, 0.0, -30.0,
  -30.0, 0.0, -30.0
]
var floorIndices = [
  0, 1, 2, 0, 2, 3
]

var dragonPositions = stanfordDragon.positions
var dragonIndices = stanfordDragon.cells
dragonPositions = dragonPositions.reduce(function (all, vertex) {
  all.push(vertex[0] / 10)
  all.push(vertex[1] / 10)
  all.push(vertex[2] / 10)
  return all
}, [])
dragonIndices = dragonIndices.reduce(function (all, vertex) {
  all.push(vertex[0])
  all.push(vertex[1])
  all.push(vertex[2])
  return all
}, [])
Here we buffer our attribute data onto the GPU so that we can draw our floor and dragon.
var vertexPositionAttrib = gl.getAttribLocation(lightShaderProgram,
'aVertexPosition')
gl.enableVertexAttribArray(vertexPositionAttrib)

var dragonPositionBuffer = gl.createBuffer()
gl.bindBuffer(gl.ARRAY_BUFFER, dragonPositionBuffer)
gl.bufferData(gl.ARRAY_BUFFER, new Float32Array(dragonPositions),
gl.STATIC_DRAW)
gl.vertexAttribPointer(vertexPositionAttrib, 3, gl.FLOAT, false, 0,
0)

var dragonIndexBuffer = gl.createBuffer()
gl.bindBuffer(gl.ELEMENT_ARRAY_BUFFER, dragonIndexBuffer)
gl.bufferData(gl.ELEMENT_ARRAY_BUFFER,
new Uint16Array(dragonIndices), gl.STATIC_DRAW)

var floorPositionBuffer = gl.createBuffer()
gl.bindBuffer(gl.ARRAY_BUFFER, floorPositionBuffer)
gl.bufferData(gl.ARRAY_BUFFER, new Float32Array(floorPositions),
gl.STATIC_DRAW)
gl.vertexAttribPointer(vertexPositionAttrib, 3, gl.FLOAT, false, 0,
0)

var floorIndexBuffer = gl.createBuffer()
gl.bindBuffer(gl.ELEMENT_ARRAY_BUFFER, floorIndexBuffer)
gl.bufferData(gl.ELEMENT_ARRAY_BUFFER,
new Uint16Array(floorIndices), gl.STATIC_DRAW)
This part is important for our color depth texture technique. We create a framebuffer that we can use to render our scene from our light’s viewpoint.
We set up a shadowDepthTexture variable that we’ll turn into a WebGL Texture. This texture will hold the output of our light’s shader program. Which means that it holds all of the encoded depth information of our scene.
gl.useProgram(lightShaderProgram)

var shadowFramebuffer = gl.createFramebuffer()
gl.bindFramebuffer(gl.FRAMEBUFFER, shadowFramebuffer)

var shadowDepthTexture = gl.createTexture()
gl.bindTexture(gl.TEXTURE_2D, shadowDepthTexture)
gl.texParameteri(gl.TEXTURE_2D, gl.TEXTURE_MAG_FILTER, gl.NEAREST)
gl.texParameteri(gl.TEXTURE_2D, gl.TEXTURE_MIN_FILTER, gl.NEAREST)
gl.texImage2D(gl.TEXTURE_2D, 0, gl.RGBA, shadowDepthTextureSize,
shadowDepthTextureSize, 0, gl.RGBA, gl.UNSIGNED_BYTE, null)

var renderBuffer = gl.createRenderbuffer()
gl.bindRenderbuffer(gl.RENDERBUFFER, renderBuffer)
gl.renderbufferStorage(gl.RENDERBUFFER, gl.DEPTH_COMPONENT16,
shadowDepthTextureSize, shadowDepthTextureSize)

gl.framebufferTexture2D(gl.FRAMEBUFFER, gl.COLOR_ATTACHMENT0,
gl.TEXTURE_2D, shadowDepthTexture, 0)
gl.framebufferRenderbuffer(gl.FRAMEBUFFER, gl.DEPTH_ATTACHMENT,
gl.RENDERBUFFER, renderBuffer)

gl.bindTexture(gl.TEXTURE_2D, null)
gl.bindRenderbuffer(gl.RENDERBUFFER, null)
We create the orthographic projection matrix and view matrix for our light.
When shadow mapping a directional light you use an orthographic projection because you want to simulate parallel rays of light hitting your scene.
Put differently, because there is no perspective in an orthographic projection, only points that are directly behind the dragon will be considered in the shadow.
Contrast this with say, a spotlight, where a shadow typically grows as it gets farther away from the shadow caster. A spotlight shadow can be modeled with a perspective matrix.
Note that our method of creating an orthographic projection here is suboptimal! Here we just picked bounds that encompassed our scene, but in a resource constrained application you’ll want to dynamically calculate an orthographic projection that perfectly wraps your camera’s view frustrum (plus some offset if you want objects outside of the frustrum to be able to cast shadows. such as a tall tree in the distance).
If you’re intersted in learning more about this let me know!.
var lightProjectionMatrix = glMat4.ortho(
  [], -40, 40, -40, 40, -40.0, 80
)
var lightViewMatrix = glMat4.lookAt([], [0, 2, -3], [0, 0, 0],
[0, 1, 0])
Here we set up some of our uniform data for rendering.
The important piece is that we pass our texture uniform to our camera shader. This is how our camera has access to all of the depth information that we got from our light shader.
Our light wrote it’s depth information to a color texture, and our camera makes use of this color texture here.
var shadowPMatrix = gl.getUniformLocation(lightShaderProgram,
'uPMatrix')
var shadowMVMatrix = gl.getUniformLocation(lightShaderProgram,
'uMVMatrix')

gl.uniformMatrix4fv(shadowPMatrix, false, lightProjectionMatrix)
gl.uniformMatrix4fv(shadowMVMatrix, false, lightViewMatrix)

gl.bindBuffer(gl.ARRAY_BUFFER, floorPositionBuffer)
gl.vertexAttribPointer(vertexPositionAttrib, 3,
gl.FLOAT, false, 0, 0)

gl.bindBuffer(gl.ELEMENT_ARRAY_BUFFER, floorIndexBuffer)
gl.bufferData(gl.ELEMENT_ARRAY_BUFFER,
new Uint16Array(floorIndices), gl.STATIC_DRAW)

gl.bindFramebuffer(gl.FRAMEBUFFER, null)

gl.useProgram(cameraShaderProgram)

var samplerUniform = gl.getUniformLocation(cameraShaderProgram,
'depthColorTexture')

gl.activeTexture(gl.TEXTURE0)
gl.bindTexture(gl.TEXTURE_2D, shadowDepthTexture)
gl.uniform1i(samplerUniform, 0)

var uMVMatrix = gl.getUniformLocation(cameraShaderProgram,
'uMVMatrix')
var uPMatrix = gl.getUniformLocation(cameraShaderProgram,
'uPMatrix')
var uLightMatrix = gl.getUniformLocation(cameraShaderProgram,
'lightMViewMatrix')
var uLightProjection = gl.getUniformLocation(cameraShaderProgram,
'lightProjectionMatrix')
var uColor = gl.getUniformLocation(cameraShaderProgram, 'uColor')

gl.uniformMatrix4fv(uLightMatrix, false, lightViewMatrix)
gl.uniformMatrix4fv(uLightProjection, false, lightProjectionMatrix)
gl.uniformMatrix4fv(uPMatrix, false, glMat4.perspective([],
Math.PI / 3, 1, 0.01, 900))
We create a function that will draw our shadow map. It first binds our framebuffer (which allows us to write to our dedicated color texture) and then renders our dragon.
We don’t need to render our floor since we know that our floor won’t need to cast any shadows.
var dragonRotateY = 0

function drawShadowMap () {
  dragonRotateY += 0.01

  gl.useProgram(lightShaderProgram)

  gl.bindFramebuffer(gl.FRAMEBUFFER, shadowFramebuffer)

  gl.viewport(0, 0, shadowDepthTextureSize, shadowDepthTextureSize)
  gl.clearColor(0, 0, 0, 1)
  gl.clearDepth(1.0)
  gl.clear(gl.COLOR_BUFFER_BIT | gl.DEPTH_BUFFER_BIT)

  gl.bindBuffer(gl.ARRAY_BUFFER, dragonPositionBuffer)
  gl.vertexAttribPointer(vertexPositionAttrib, 3, gl.FLOAT, false,
  0, 0)
  gl.bindBuffer(gl.ELEMENT_ARRAY_BUFFER, dragonIndexBuffer)

  var lightDragonMVMatrix = glMat4.create()
  glMat4.rotateY(lightDragonMVMatrix, lightDragonMVMatrix,
  dragonRotateY)
  glMat4.translate(lightDragonMVMatrix, lightDragonMVMatrix,
  [0, 0, -3])
  glMat4.multiply(lightDragonMVMatrix, lightViewMatrix,
  lightDragonMVMatrix)
  gl.uniformMatrix4fv(shadowMVMatrix, false, lightDragonMVMatrix)

  gl.drawElements(gl.TRIANGLES, dragonIndices.length,
  gl.UNSIGNED_SHORT, 0)

  gl.bindFramebuffer(gl.FRAMEBUFFER, null)
}
Here we use the shadowDepthTexture to draw the scene from our camera’s perspective.
function drawModels () {
  gl.useProgram(cameraShaderProgram)
  gl.viewport(0, 0, 500, 500)
  gl.clearColor(0.98, 0.98, 0.98, 1)
  gl.clear(gl.COLOR_BUFFER_BIT | gl.DEPTH_BUFFER_BIT)

  var camera = glMat4.create()
  glMat4.translate(camera, camera, [0, 0, 45])
  var xRotMatrix = glMat4.create()
  var yRotMatrix = glMat4.create()
  glMat4.rotateX(xRotMatrix, xRotMatrix, -xRotation)
  glMat4.rotateY(yRotMatrix, yRotMatrix, yRotation)
  glMat4.multiply(camera, xRotMatrix, camera)
  glMat4.multiply(camera, yRotMatrix, camera)
  camera = glMat4.lookAt(camera,
  [camera[12], camera[13], camera[14]], [0, 0, 0], [0, 1, 0])

  var dragonModelMatrix = glMat4.create()
  glMat4.rotateY(dragonModelMatrix, dragonModelMatrix,
  dragonRotateY)
  glMat4.translate(dragonModelMatrix, dragonModelMatrix,
  [0, 0, -3])

  var lightDragonMVMatrix = glMat4.create()
  glMat4.multiply(lightDragonMVMatrix, lightViewMatrix,
  dragonModelMatrix)
  gl.uniformMatrix4fv(uLightMatrix, false, lightDragonMVMatrix)

  gl.uniformMatrix4fv(
    uMVMatrix,
    false,
    glMat4.multiply(dragonModelMatrix, camera, dragonModelMatrix)
  )

  gl.uniform3fv(uColor, [0.36, 0.66, 0.8])

  gl.activeTexture(gl.TEXTURE0)
  gl.bindTexture(gl.TEXTURE_2D, shadowDepthTexture)
  gl.uniform1i(samplerUniform, 0)

  gl.drawElements(gl.TRIANGLES, dragonIndices.length,
  gl.UNSIGNED_SHORT, 0)

  gl.bindBuffer(gl.ARRAY_BUFFER, floorPositionBuffer)
  gl.bindBuffer(gl.ELEMENT_ARRAY_BUFFER, floorIndexBuffer)
  gl.vertexAttribPointer(vertexPositionAttrib, 3, gl.FLOAT, false,
  0, 0)

  gl.uniformMatrix4fv(uLightMatrix, false, lightViewMatrix)
  gl.uniformMatrix4fv(uMVMatrix, false, camera)
  gl.uniform3fv(uColor, [0.6, 0.6, 0.6])

  gl.drawElements(gl.TRIANGLES, floorIndices.length,
  gl.UNSIGNED_SHORT, 0)
}
And lastly we set things up so that our canvas re-renders every animation frame.
function draw () {
  drawShadowMap()
  drawModels()

  window.requestAnimationFrame(draw)
}
draw()
Now just enter ./node_modules/budo/bin/cmd.js tutorial.js --open --live to view your work.
Good stuff!
Just gimme the light!
Well done making it through - you now know how to implement shadow mapping!
There are many, many ways to improve your shadow maps such as front-face culling and calculating the perfect orthographic matrix to use for your light.
You can add in more and more techniques as you run into issues, but for most simple scenes the basics that you’ve learned here should have you covered!
What would you like to learn next? Let me know on Twitter :)
Til’ next time,
- CFN