Unit Testing WebGL Components
In this tutorial you’ll learn how to unit test a WebGL component. A WebGL component is just a function that takes in your canvas’s WebGL context (as well as any relevant data) and then draws something onto your canvas.
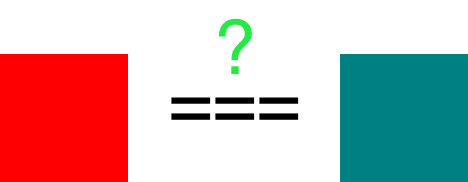
 We’ll render two canvases and compare their contents
Setting the stage
We’ll be using a very basic WebGL component to keep things simple, but the approach that you’ll learn works exactly the same for more complicated components. For example, I use this approach when testing my work-in-progress WebGL skeletal animation renderer
We’ll keep this tutorial in one file to keep things simple, but in a real library your tests are usually separate from your source code.
And one more thing. We’ll be modifying our tests in order to make them fail, instead of modifying the source. If you’re an experienced unit tester this may or may not jump out as an odd teaching approach to you.. So just remember that our goal here is to teach WebGL unit testing concepts, not test-driven development.
Now that we’ve set the stage, let’s jump right in.
Setting up our tutorial
First let’s create a directory and file to write our code in.
mkdir unit-testing-webgl-tutorial
cd unit-testing-webgl-tutorial
touch tutorial.js
Now let’s download our Node.js package dependencies. We’ll download versions that
we know for certain work in order to prevent this tutorial from breaking
in the future as these libraries receive updates.
npm install gl@4.0.3 get-pixels@3.3.0 save-pixels@2.3.4 \
tape@4.6.3 ndarray@1.0.18 \
image-diff@1.6.3 webgl-to-img-stream@1.0.0
image-diff is an image comparison tool that depends on imagemagick, so we’ll need to install imagemagick.
brew install imagemagick
If you don’t have homebrew you can also visit the imagemagick download page in order to install it.
You will not need an internet connection for the rest of the tutorial.
Creating our WebGL component
Open up tutorial.js and add the code for our very basic WebGL component:
function drawBackground (gl, color) {
  gl.clearColor(color[0], color[1], color[2], 1)
  gl.clear(gl.COLOR_BUFFER_BIT | gl.DEPTH_BUFFER_BIT)
}
Whenever we call this function on our WebGL context it will paint over our canvas with the color that we pass in. Keep in mind that in a real component you’d do a lot more than just setting the background color. You might render a fire particle effect, add some post-processing effects, draw an animated rabbit doing the cuban shuffle, or anything else that you can imagine.
Rendering our canvas to an image
Now that we have a component, we want to test it. We’ll first create a function that can save the contents of our canvas to an image on our file system.
function saveCanvasToImage (gl, width, height, filepath) {
  var fs = require('fs')
  var path = require('path')
  var webGlToImgStream = require('webgl-to-img-stream')
  var outputFileStream = fs.createWriteStream(
    path.resolve(__dirname, filepath)
  )
  webGlToImgStream(gl, width, height, outputFileStream)
}
Next we’ll create a WebGL context in Node.js, then render to our context’s canvas and save this rendering onto an image on our file system.
var canvasWidth = 64
var canvasHeight = 64
var createContext = require('gl')
var gl = createContext(canvasWidth, canvasHeight)
gl.viewport(0, 0, canvasWidth, canvasHeight)

// [1, 0, 0] is red
drawBackground(gl, [1, 0, 0])
saveCanvasToImage(gl, canvasWidth,
canvasHeight, './expected.png')
Run what you have so far by running node tutorial.js.
If you look inside of your tutorial directory you should now see a file called expected.png, which is a 64x64 pixel red square.
 Our expected rendering from our WebGL component
This is the key idea for testing WebGL components. Once you have your component working you save a rendering to an expected image file.
Then in the future as you update and optimize your code, your tests will automatically verify that any changes that you make still end up rendering to an image that is the exact match with the one that you’re expecting.
Now that you have the expected image, you can comment out the code from earlier where we were generating it.
/* This code from earlier is now commented out
// [1, 0, 0] is red
drawBackground(gl, [1, 0, 0])
saveCanvasToImage(gl, canvasWidth,
canvasHeight, './expected.png')
*/
Testing our component
Alright now let’s write a test for our component.
var test = require('tape')
var imageDiff = require('image-diff')

test(function (t) {
  t.plan(1)

  drawBackground(gl, [0, 0, 0.5])
  saveCanvasToImage(gl, canvasWidth,
    canvasHeight, './actual.png')

  imageDiff({
    actualImage: './actual.png',
    expectedImage: './expected.png'
  }, function (err, imagesAreSame) {
    if (err) { t.notOk(err) }
    t.ok(imagesAreSame, 'Images match')
  })
})
 The output from our failing test. Blue is not red.
Our test tries to call our component with a blue [0, 0, 0.5] background. It then compares this blue image to our expected red one to see if they match.
As you might expect, when we run this test it will fail.
node tutorial.js
You should see failure output similar to this:
TAP version 13
# (anonymous)
not ok 1 Images match
  ---
    operator: ok
    expected: true
    actual:   false
    at: ...
  ...

1..1
# tests 1
# pass  0
# fail  1
Passing our tests
Let’s change the drawBackground(gl, [0, 0, 0.5]) line in our test to this:
drawBackground(gl, [1, 0, 0])
And re-run our tests
node tutorial.js
Your tests should now pass since you’ve generating an image that matches the expected one that you created earlier.
You should see success output similar to this:
TAP version 13
# (anonymous)
ok 1 Images match

1..1
# tests 1
# pass  1

# ok
Zamnnn - you did it
What would you like to learn next? Let me know on Twitter!
Til’ next time,
- CFN